Author Topic: AH3 skins  (Read 7968 times)

Offline FTJR

  • Silver Member
  • ****
  • Posts: 1996
Re: AH3 skins
« Reply #15 on: November 03, 2015, 10:25:49 PM »
Thats just beautiful Greebo  :aok
Bring the Beaufighter to Aces High
Raw Prawns      

B.O.S.S. "Beaufighter Operator Support Services" 
Storms and Aeroplanes dont mix

Offline lyric1

  • Skinner Team
  • Plutonium Member
  • *******
  • Posts: 10560
Re: AH3 skins
« Reply #16 on: November 03, 2015, 11:37:05 PM »
 :aok

Offline bustr

  • Plutonium Member
  • *******
  • Posts: 12436
Re: AH3 skins
« Reply #17 on: November 04, 2015, 12:18:24 PM »
Greebo should get perk points in AH3 for every time a player fly's into the ground admiring his skins. I bet the numbers of player induced auguring will go way up for the first few months of AH3..... :O
bustr - POTW 1st Wing


This is like the old joke that voters are harsher to their beer brewer if he has an outage, than their politicians after raising their taxes. Death and taxes are certain but, fun and sex is only now.

Offline Greebo

  • Skinner Team
  • Platinum Member
  • ******
  • Posts: 6906
Re: AH3 skins
« Reply #18 on: November 04, 2015, 02:21:59 PM »
Several people have asked for a better explanation of the new AH3 skin file system so I will give it a go here.

The current AH2 skins system uses image maps to control the diffuse, bump and specular effects for each individual pixel of a skin, with text files to alter other lighting effects globally over the whole skin. When AH3 does go live then all skins will be changed to a new system where only image maps are used to control these effects. The AH3 skin files will have different names and existing skins will have their files renamed automatically by HTC. Until AH3 goes live any skins submissions will use the existing system.

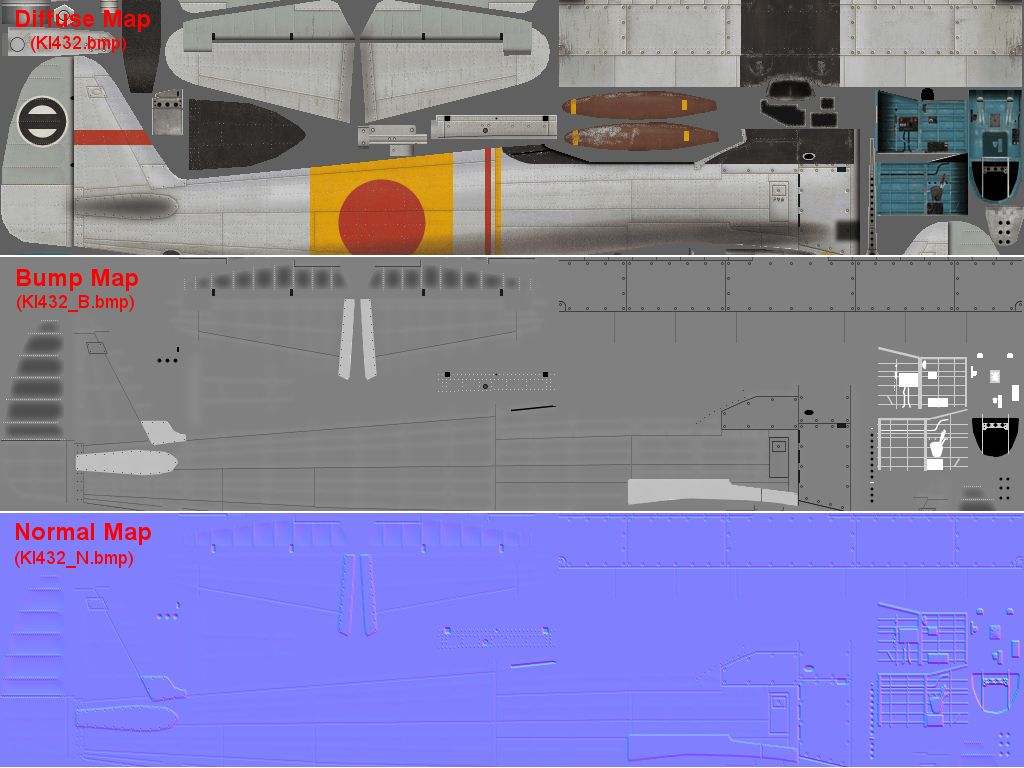
Shown below are six versions of the same section from an existing Ki-43 skin that I have updated to the new AH3 format. Some of these are the same as before or just renamed and some are new. Apart from the diffuse the other files will be optional with the possible exception of the specular file, I am still awaiting clarification from HTC on that.

The Diffuse Map is the basic skin file that all skins share, it is simply a painting of the skin draped over the 3D shape. No changes have been made to this file, even the name stays the same as before. It may be that some skinners will want to reduce or remove some baked-in shading effects from their diffuse maps that can better be done with the other maps.

The Bump Map is again the same file and retains the same name as in AH2. This file allows the game to generate fake bump and dips on the surface of the skin by creating shadows and highlights derived from the position of the sun. Light shades are bumps and dark shades dips.

The Normal Map is the first of the new maps and has an _N suffix file name. It does the same job as the bump map but is more detailed and appears as a violet 3D image. Either a bump or a normal map can be submitted with a skin, there is no need for both. A normal map is made from a bump map using special software such as the programs I have linked below.

Nvidia make a free normal-generating plug-in that works with Photoshop and Paintshop Pro:- https://developer.nvidia.com/nvidia-texture-tools-adobe-photoshop
There is also a free normal tool available for Gimp: http://registry.gimp.org/node/69

Some normal software is stand-alone and some can be linked to your graphics editing program as a plug-in that you can access directly through a menu command. Your graphics program's help file should tell you how to set up a plug-in if you don't know how. Before making a normal map you first need to make sure the bump map image you are making it from is in the right format. All the other files listed here are saved as 8-bit bmps (256 colour or greyscale) but the normal-generating software will only work on higher bit rates, ideally 32-bit. Increasing the bit-rate can easily be done in any graphics program, although not necessarily right up to 32-bit.

Once you activate your normal software it will bring up a window giving numerous display options. On the Nvidia plug-in that I use the only settings I have altered from default are "Invert Y" and "Scale". Invert Y changes the look of the normal file so that it appears light is coming from the top rather than the bottom of the image and this makes the resultant normal image a lot easier to understand. Scale alters the size of the bumps, a bigger number means bigger bumps. You can also reduce the bump sizes by using less extreme shades of grey on your original bump map but generally it is better to use the scale setting.

The reason for submitting a normal map rather than a bump map is that it is far more detailed. For example the bump map image below shows some blurred dips on the fabric control surfaces and blurred lines over the rivet lines. However I created these for use with the normal map. On a bump map the low bit-rate causes blurred shapes like these to have a badly-banded appearance on the skin (put another way, it looks crap). On a normal map however there is much less banding and it can give the illusion of dips between the underlying structure of the airframe. The blurred white lines are made from a copy of the rivet layer which is then just gaussian blurred by several pixels.

The 
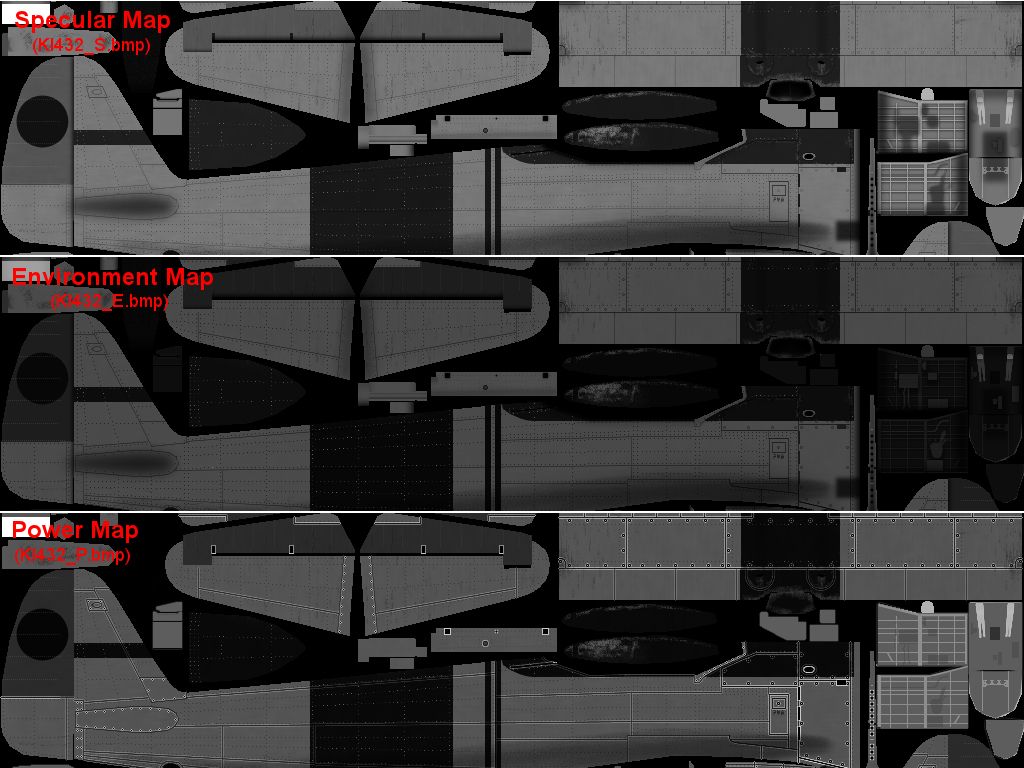
Specular Map is essentially the same as in AH2 but the file's suffix has changed from _B_a to a more logical _S. This file controls how the surface of the skin reflects the sun's rays. Lighter areas are more reflective and darker less. This file makes a big difference to bare metal skins like this Ki-43, the bright reflections on the metal areas and weak ones on the paintwork create a powerful illusion.

The Environment Map is a new file with an _E suffix. It controls how the skin reflects the sky and land around it. The environment map is created from a copy of the specular map and  looks quite similar to it. This is because different surfaces tend to reflect both the sun's rays and the environment to a similar degree, i.e metal reflects both types of light better than paint. An area of the environment map that is close to white will give a chrome-like appearance to the skin. While this can be quite pretty my personal view is that this is not very realistic for a WW2 metal finish so I like to dull this effect down. This is why the environment map shades shown below are a bit darker than their specular map equivalents. The only areas that are near-white are glass areas and highly polished inner gear legs.

The Power Map is another new file with a _P suffix. It controls how sharp the highlights are on the skin. This is also created from the specular map and also look similar to it with sharper highlights shown in lighter shades. It looks similar because shiny surfaces like metal tend to have sharp highlights and matt surfaces like paint or rubber have vague highlights.

There is one different effect that can be added to the power map however. It is possible to make the edges of the panels to either side of panel lines have extra-sharp highlights. On the power map image below you can see I have got lighter lines outlining my panel lines and this is fairly simple to achieve. If you have several panel line layers make copies of each layer and merge these. Call this layer "Merged panel lines". Now make another copy of this layer, call it "Panel line edges" and turn all the lines on it white. Using copy and paste carefully position four copies of the white lines so that each copy is one pixel offset to the top, bottom left and right. What you should end up with is a panel line layer in white but with three pixel thick lines.  Next move back to the "Merged panel line" layer, use a select tool to select all the lines, go back to the "Panel line edges" layer and hit the "delete" key. This erases the centres of your three-pixel thick lines, but leaves the outer lines intact. The merged panel line layer can now be deleted. For this bare metal skin I made a second copy of the panel edges layer and put one above the paint layers and one below to create harder edge highlights on the bare metal areas.

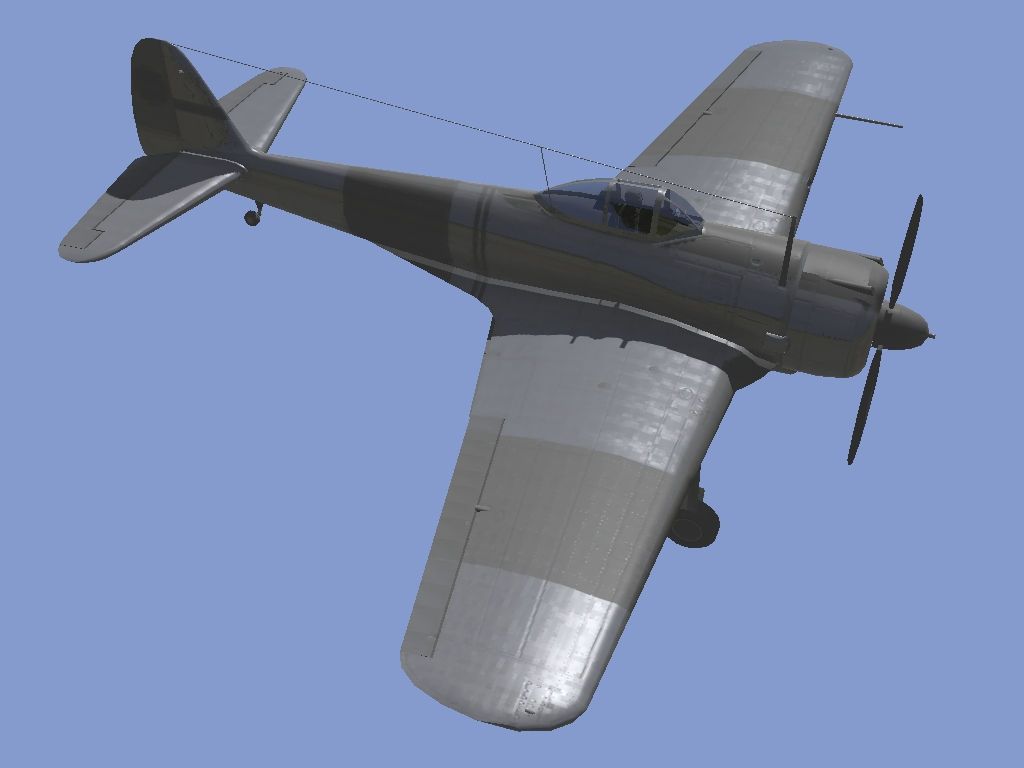
Putting it all together. The alpha skin viewer has a number of new buttons to help skinners work with these new files. These allow the effects of each map to be viewed in isolation, or with all the effects shown together or, as in the "Lighting Only"screenshot below, with all the effects except the diffuse map shown. Here you can see the effects of the normal map, the panel lines scribed into the surface and the structure ripples in the highlights on the wing. Also the specularity, environment and power differences in the reflections between the painted and bare metal areas. The environment effect is displayed best on the side of the fuselage which is bluer on its top half and greener below.

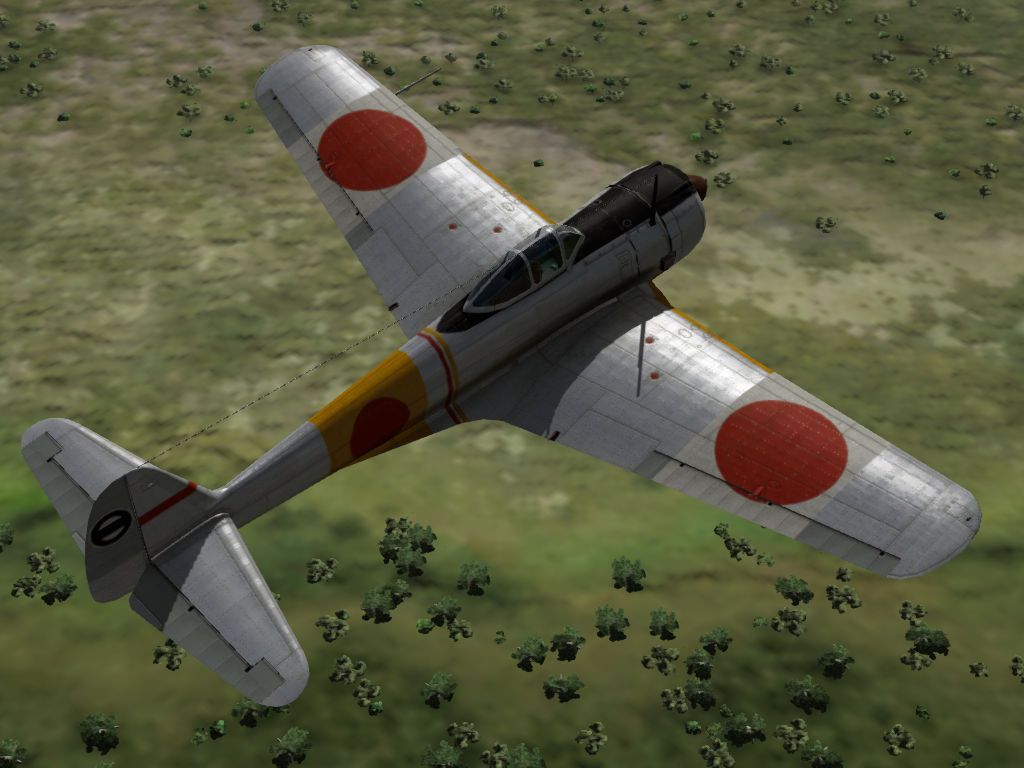
The in-game screenshots shows what it looks like when its all put together.


« Last Edit: November 04, 2015, 02:41:40 PM by Greebo »

Offline PJ_Godzilla

  • Gold Member
  • *****
  • Posts: 2661
Re: AH3 skins
« Reply #19 on: November 04, 2015, 03:06:15 PM »
Fabulous, Greebo... The bump map is effectively the structure read-through overlay. You make me want to take this up, but it would have to get in line. Besides, you're doing so well with it.
Some say revenge is a dish best served cold. I say it's usually best served hot, chunky, and foaming. Eventually, you will all die in my vengeance vomit firestorm.

Offline Waffle

  • HTC Staff Member
  • Administrator
  • *****
  • Posts: 4849
      • HiTech Creations Inc. Aces High
Re: AH3 skins
« Reply #20 on: November 04, 2015, 03:31:23 PM »
You're having WAY too much fun with this Greebo!  :aok

Offline USCH

  • Silver Member
  • ****
  • Posts: 1713
Re: AH3 skins
« Reply #21 on: November 04, 2015, 05:33:41 PM »
It appears you have a handle err brush on the new skin viewer.

HiTech
budump-bump-tisk

Offline WEZEL

  • Silver Member
  • ****
  • Posts: 815
Re: AH3 skins
« Reply #22 on: November 04, 2015, 09:59:52 PM »
wow awesome work  :salute

Offline MachNix

  • Nickel Member
  • ***
  • Posts: 644
Re: AH3 skins
« Reply #23 on: November 05, 2015, 08:53:39 AM »
Thanks, Greebo.

I think the diffuse map has changed between AH2 and AH3.  The map is no longer restricted to 8-bit, 256 colors in AH3.  Maybe the restriction of using indexed colors changed at some point in AH2 and I missed the memo.

What happens to your beautiful skin at resolutions less then 1024?  I'm assuming all the maps are downsized?

Offline Triton28

  • Gold Member
  • *****
  • Posts: 2248
Re: AH3 skins
« Reply #24 on: November 05, 2015, 12:31:15 PM »
Awesome work Greebo.   :rock
Fighting spirit one must have. Even if a man lacks some of the other qualifications, he can often make up for it in fighting spirit. -Robin Olds
      -AoM-


Offline Volron

  • Platinum Member
  • ******
  • Posts: 5780
Re: AH3 skins
« Reply #25 on: November 05, 2015, 01:11:39 PM »
You're having WAY too much fun with this Greebo!  :aok

What did you expect when you guys presented him with better ways to paint the toys? :D  Skinner gotta skin!  :x


VERY nice Greebo, very nice indeed. :aok
Quote from: hitech
Wow I find it hard to believe it has been almost 38 days since our last path. We should have release another 38 versions by now  :bhead
HiTech
Quote from: Pyro
Quote from: Jolly
What on Earth makes you think that i said that sir?!
My guess would be scotch.

Offline Chilli

  • Platinum Member
  • ******
  • Posts: 4278
Re: AH3 skins
« Reply #26 on: November 05, 2015, 02:46:33 PM »
Thanks Greebo, that link works great for Gimp and I actually was able to easily make a normal map for an existing AH2 skin (just testing).

What I would like to know next is how do you get the "bump" elevations?  Is that all done by hand?  Last feeble attempt that I made, I tried taking an existing skin desaturated or gray scaled it.  The difficulty was getting rid of the "painted" surfaces. 


Offline Greebo

  • Skinner Team
  • Platinum Member
  • ******
  • Posts: 6906
Re: AH3 skins
« Reply #27 on: November 05, 2015, 06:54:13 PM »
Using a grey scaled copy of the diffuse bmp is not going to work at all well for the bump or any of the other maps. You can use your main multi-layer working file to speed the process though.

Once I have finished making the main diffuse skin, I then start on the bump map. This is begun by making an extra copy of the diffuse working file with all its layers, renaming it with a _B suffix and changing it from 256 colours to greyscale. I then delete all the layers I can't use (colour scheme, weathering, shadows and highlights etc.) so I am left with layers that are useful for the bump map like the ones for panel lines, fasteners, holes and rivets. A base layer is created, flood filled with a middle shade of grey and placed at the bottom of the layer stack. The various layers above are then adjusted for grey shade and/or opacity. A copy of the skin bmp is pasted in to use as a guide for positioning other stuff accurately and this is turned off once the map is done.

Once everything I can use has been taken from the diffuse file I start creating any other layers I want to draw by hand. On the Ki-43 bump map shown above the raised aluminium fairing panels between the fuselage and flying surfaces were hand painted as a new layer, also some of the internal structure parts. Pretty much everything else was copied directly or modified from diffuse skin layers. For instance the raised structure areas were made from a copy of the rivet layer that was gaussian blurred and the sunken areas on the fabric control surfaces were created from a mask I used to do the fabric effects on the diffuse texture.

I can get away with doing so little work on the bump and other maps because I build the main diffuse map with these other maps in mind. Partly this is a question of not trying to cram lots of different stuff onto one layer which is a mistake I see other skinners make. For example all the little black holes on the bump map have their own layer on the diffuse so I don't need to do anything to this layer on the other maps. On my earlier skins I'd put things like landing lights on that layer too which I'd then have to edit out onto new layers on the other maps. My diffuse maps often have close to 100 layers, I have seen work by other skinners where try to cram it all into 10 or less.
 

Offline Greebo

  • Skinner Team
  • Platinum Member
  • ******
  • Posts: 6906
Re: AH3 skins
« Reply #28 on: November 05, 2015, 07:06:42 PM »
Thanks, Greebo.

I think the diffuse map has changed between AH2 and AH3.  The map is no longer restricted to 8-bit, 256 colors in AH3.  Maybe the restriction of using indexed colors changed at some point in AH2 and I missed the memo.

What happens to your beautiful skin at resolutions less then 1024?  I'm assuming all the maps are downsized?

That would be news to me. As far as I know everything except the normal map is still 256 colour or grey scale. It may be the case that the skin viewer will work with files of greater bit-depth but I don't think HTC would accept them in a submission.

When a skin is viewed in a resolution less than it was created in it appears as a blurry mess. For example a 1024 res B-24 skin will look sharper than a 2048 res one to a player who sets a maximum texture resolution of 1024. Any player who is reducing texture size to gain FPS will probably have bump mapping turned off as well so the other maps will likely be a moot point.

Offline Chilli

  • Platinum Member
  • ******
  • Posts: 4278
Re: AH3 skins
« Reply #29 on: November 05, 2015, 07:19:40 PM »
Thanks, I certainly have respect for all those who are able to put every rivet and panel in place.  I was fantasizing that normal map could be manipulated from other files that already contain that information.  But as you have clearly stated, layers are the way to go, and without the skinner's or HTC's bmp file or corresponding layer, it is not that doable.