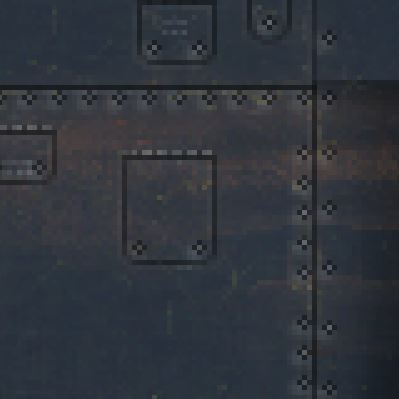
Just had a look at one of my F4U templates to see how I did the flush fasteners. Each fastener is made up of four black pixels in a cross pattern with a fifth metal coloured pixel in the middle. More often though for flush fasteners I would use a three pixel diameter circle with a one pixel line width to get a similar effect.
I copied and pasted these fasteners across the skin as needed. If you are trying to use a dotted line tool to create a line of fasteners that may be why they look blurry. I gave up on that technique for rivets and fasteners long ago, at the low pixel densities used on AH skins it always looks a blurry mess.
The black pixels are on a "fasteners" layer and the metal coloured centres are on a "chipped fastener" layer. I used a low density eraser tool to make the chipped rivet effect vary a bit. Having the two layers allows me to vary their levels with the layer opacity sliders, not just in the diffuse map but the other four maps too. In the normal map I turn the chipped rivets off entirely. The chipped fastener effect isn't something I always do on skins.
Depending on the relative size and design of the fasteners on the plane I am skinning and also on the pixel surface density of the skin I have various ways of doing them. If the flush fasteners above look too big I might make them from a square four black pixel block or a black one pixel block. On some of the 2048 or above skins I have used a four pixel diameter circle for some of the larger fasteners.
On some aircraft not all the fasteners are flush either. For raised fasteners I will create a seperate layer with the fasteners made up of either one pixel white dots or solid white circles of 3 or more pixel diameter. Once I have pasted all these fasteners across the skin I duplicate the layer, call the new layer "raised fastener shadows" and then reduce the layer's brightness to -255% to turn the shadows black. Next I apply a Gaussian blur to the fastener shadows, go back to the raised fastener layer, select all the fasteners, go back to the raised fastener shadow layer and hit delete. This sounds complicated but it takes less time to do than to type.
Once the layer opacities are adjusted I end up with a light coloured centre dot or circle which is not a lot different from the flush fastener but the effect is blurrier. Also in the normal map for raised fasteners the light centres are kept to create bumps and the outer shadows are deleted, with flush fasteners the dark parts are kept to create dips.
