REMOVAL - TIMING BELT
CAUTION: The following procedure can only be used when the camshaft sprockets HAVE NOT BEEN LOOSENED or removed from the camshafts. Once the camshaft sprockets are loosened, an engine timing procedure is required. This procedure is detailed in the Camshaft Removal and Installation procedures.
CAUTION: The 3.2/3.5L are NOT freewheeling engines. Therefore, care should be taken not to rotate the camshafts or crankshaft with the timing belt removed.
Disconnect negative cable from remote jumper terminal.
Remove radiator upper crossmember.
Remove the radiator fan.
Remove the accessory drive belts.
Remove the crankshaft vibration damper.
Remove the front timing belt covers.
Mark belt running direction, if timing belt is to be reused.
CAUTION: When aligning timing marks, always rotate engine by turning the crankshaft. Failure to do so will result in valve and/or piston damage.
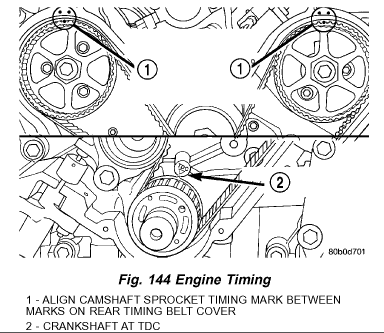
Rotate engine clockwise until crankshaft mark aligns with the TDC mark on oil pump housing and the camshaft sprocket timing marks are between the marks on the rear covers (Fig. 144).
CAUTION: Align the camshaft sprockets between the marks on rear belt covers before timing belt removal or damage to valve and/or pistons could occur.
Using a ink or paint marker; mark the exact position of the camshaft sprocket timing mark relative to the two timing marks on the rear timing cover.
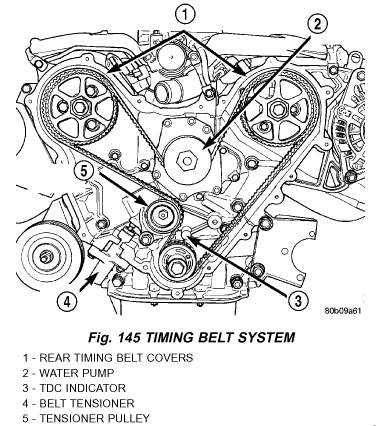
Remove the timing belt tensioner (Fig. 145) and remove timing belt.
CAUTION: Compress the tensioner slowly, as damage to tensioner could result.
When tensioner is removed from the engine it is necessary to compress the plunger into the tensioner body.
CAUTION: Index the tensioner in the vise the same way it is installed on the engine. This ensures proper pin orientation when tensioner is installed on the engine.

Place the tensioner into a vise and SLOWLY compress the plunger (Fig. 146). Total bleed down of tensioner should take about 5 minutes.
When plunger is compressed into the tensioner body install a pin through the body and plunger to retain plunger in place until tensioner is installed.
REMOVAL - CAMSHAFT SPROCKETS
CAUTION: The 3.2/3.5L engines are NOT a freewheeling design. Therefore, care should be taken not to rotate the camshafts or crankshaft with the timing belt removed.
CAUTION: When camshaft sprocket bolts are loosened or removed, the camshafts must be re-timed to the engine. Also, the camshaft sprocket bolts must NOT be reused.
Remove front timing belt covers.
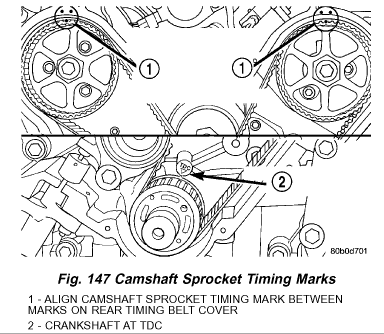
Position crankshaft sprocket to the TDC mark on the oil pump housing by turning crankshaft in the clockwise direction (Fig. 147).
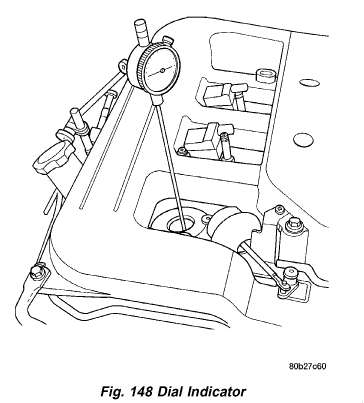
Install a dial indicator in number 1 cylinder to check TDC of the piston (Fig. 148). Rotate the crankshaft until the piston is at exactly TDC.
Remove camshaft retainer/thrust plates from rear of cylinder heads. To access the right side plate, remove the EGR valve.
NOTE: Special Tool 6642 is interchangeable between cylinder banks.
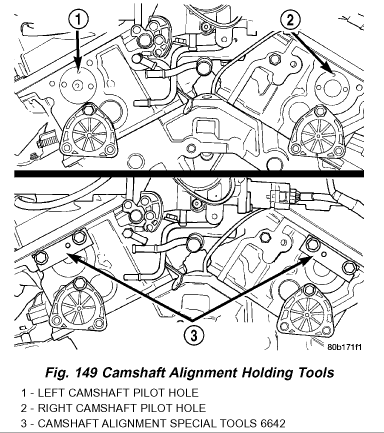
Install Special Tools 6642 Camshaft Alignment tools to the rear of each cylinder head by inserting pin on the alignment tool to the pilot hole on the camshaft. Attach tools using the retainer plate bolts. (Fig. 149).
NOTE: If the alignment tools do not properly line-up to install attaching bolts, first remove the timing belt tensioner, then slowly rotate camshaft with a wrench until bolts can be installed.
Remove the timing belt.
Hold camshaft sprocket with 36 mm (1 7/16 inch) box end wrench.
Loosen and remove bolt and washer. To remove the camshaft sprocket bolts with engine in the vehicle, it may be necessary to lift the engine to allow bolt removal clearance. The right bolt is 213 mm (8 3/8 inch) long and the left bolt is 255 mm (10.0 inch) long.
NOTE: Each sprocket has a "D" shaped hole that allows it to rotate several degrees in each direction on its shaft. This design requires the crankshaft-to-camshaft to be properly timed to ensure proper engine performance.
Remove the camshaft sprockets.
REMOVAL - CRANKSHAFT SPROCKET
Remove the timing belt.
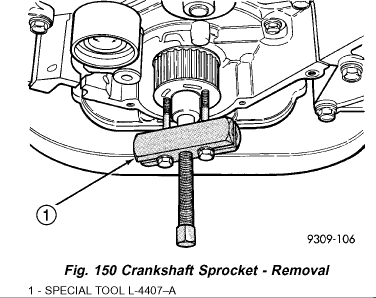
Remove crankshaft sprocket using Special Tool L-4407-A (Fig. 150).
INSPECTION - TIMING BELT
Remove timing belt covers.
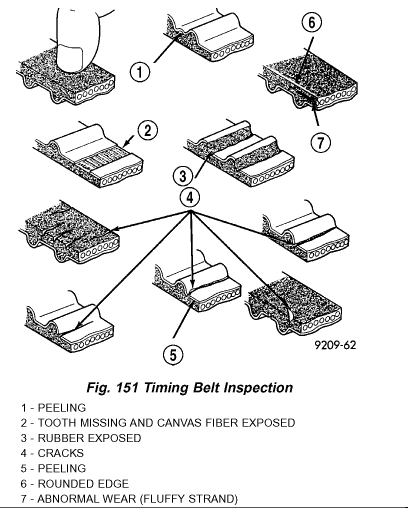
Inspect both sides of the timing belt. Replace belt if any of the following conditions exist (Fig. 151):
Hardening of back rubber back side is glossy without resilience and leaves no indent when pressed with fingernail.
Cracks on rubber back.
Cracks or peeling of canvas.
Cracks on rib root.
Cracks on belt sides.
Missing teeth.
Abnormal wear of belt sides. The sides are normal if they are sharp as if cut by a knife.
Vehicle mileage or time at component maintenance requirement.
If none of the above conditions are seen on the belt, the belt cover can be installed.
NOTE: If belt requires replacing, ensure the proper length belt is used.
INSTALLATION - TIMING BELT
CAUTION: This procedure can only be used when the camshaft sprockets HAVE NOT BEEN LOOSENED or removed from the camshafts.
CAUTION: If camshafts have moved from the timing marks, always rotate camshaft towards the direction nearest to the timing marks (DO NOT TURN CAMSHAFTS A FULL REVOLUTION OR DAMAGE to valves and/or pistons could result).
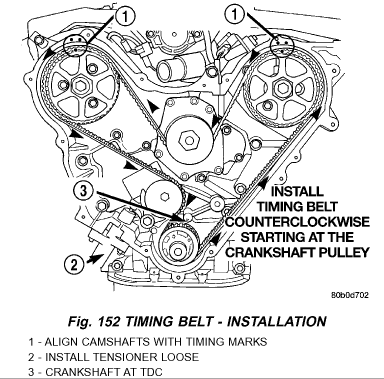
Align the crankshaft sprocket with the TDC mark on oil pump cover (Fig. 152).
Align the camshaft sprockets (to reference mark made upon removal) between the marks on the rear covers (Fig. 144).
Install the timing belt starting at the crankshaft sprocket going in a counterclockwise direction (Fig. 152). Install the belt around the last sprocket. Maintain tension on the belt as it is positioned around the tensioner pulley.
Holding the tensioner pulley against the belt. Install the tensioner into the housing and tighten to 28 Nm (250 in. lbs.) . Each camshaft sprocket mark should still fall between the cover marks.
When tensioner is in place pull retaining pin to allow the tensioner to extend to the pulley bracket.
Rotate crankshaft sprocket 2 revolutions and check the timing marks on the camshafts and crankshaft. The marks should line up within their respective locations (Fig. 152). If marks do not line up, repeat procedure.
Install the front timing belt covers.
Install the crankshaft vibration damper.
Install the accessory drive belts.
Install the radiator fan.
Install upper radiator crossmember.
Connect negative cable to remote jumper terminal.
INSTALLATION - CAMSHAFT SPROCKETS

CAUTION: The camshaft sprockets are not interchangeable from side to side (Fig. 153).
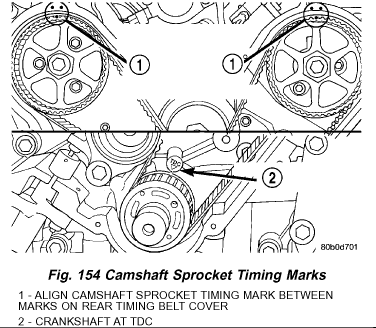
Install camshaft sprockets onto the camshafts. Install NEW sprocket attaching bolts into place. The 255 mm (10 inch) bolt is to be installed in the left camshaft and the 213 mm (8 3/8 inch) bolt is to be installed into the right camshaft. Do not tighten the bolts; tightened at later step. Camshaft sprocket mark should be positioned between the marks on the cover at both sprockets (Fig. 154).
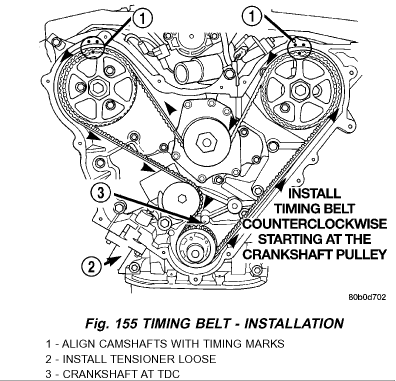
Install the timing belt starting first at the crankshaft sprocket, then to remaining components in a counterclockwise direction (Fig. 155).
Install the belt around the last sprocket. Maintain tension on the belt as it is positioned around the tensioner pulley. Each camshaft sprockets mark should still fall between the cover marks (Fig. 155).
NOTE: For timing belt tensioner reset procedure, Refer to TIMING BELT - REMOVAL.
Hold the tensioner pulley against the belt and install the reset (pinned) timing belt tensioner into the housing. Tighten attaching bolts to 28 Nm (250 in. lbs.) .
Remove tensioner retaining pin to allow the tensioner to extend to the pulley bracket.
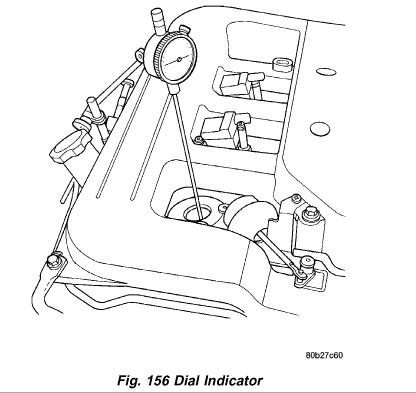
Using a dial indicator, position the number 1 piston at TDC (Fig. 156).
Hold the camshaft sprocket hex with a 36 mm (1 7/16 inch) wrench and tighten the camshaft bolts to the following:
Right side = 102 Nm (75 ft. lbs.) +90°turn
Left side = 115 Nm (85 ft. lbs.) +90°turn
Remove dial indicator and install spark plug.
Remove Special Tools 6642.
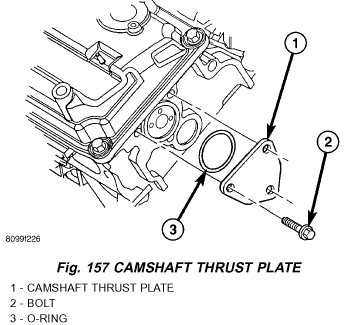
Install cam retainer/thrust plates and O-rings (Fig. 157). Tighten bolts to 28 Nm (250 in. lbs.) .
Install timing belt covers.
Install crankshaft vibration damper.
Install accessory drive belts.
Fill cooling system.
INSTALLATION - CRANKSHAFT SPROCKET
CAUTION: To ensure proper installation depth of crankshaft sprocket, Special Tool 6641 must be used.
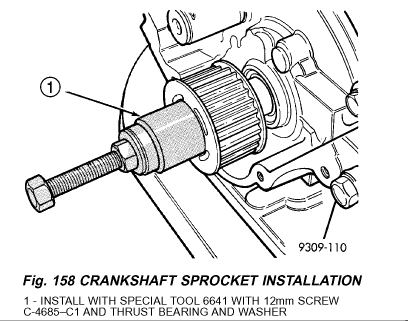
Install crankshaft sprocket using Special Tools 6641 and C-4685-C1 (Fig. 158).
Install timing belt.


