1. I don't have a problem with heavy's at high altitude and bombing. However, when at low levels, say 8K, is where the wheels go square.
Guys I fly with are picking out hangers while I'm lucky to hit the base? No calibration?
2. Also I've heard of "J" & "L" turns?
3. You've landed after a successful bombing run but lost your two drones in the process. Is your damage score reduced by two thirds or do you get full credit?
And if you don't make it back at all, did the damage/kills not count?
4. How do you join a bomber or CV TF as a gunner?
5. Lastly, how do you "hot reload" if your A/C is intact but your out of ammo? I think there's a spot at either end of the runway?
Appreciate any comments. 
1 - When in the bomb sight (the F6 key), were looking at all those numbers on the uper left corner of the screen, verify your calibrated speed and altitude is not off from your current speed and altitud readings (after more practice with studying these numbers, you do gain a "feel" for much to compensate if you're only 3 or 4 mph off. If the numbers are drasticly off, say by a dozen, recalibrate or abort that pass and set yourself up better for a second.).
I'm always watching these numbers when bombing for accuracy.
2 - J & L turns... maybe some buff expert can elaborate, im drawing a blank atm - my blind guess would be laymans for left or right.
3 - I suck at the numbers crunching and Lusche gave the acurate answer: If you drop all your ord on target and loose one drone RTBing - you loose perks for each perked drone you loose, you get full credit (names in lights) for total damage you inflicted regardless of loosing one of your bombers post-drop, but I am myself confused by the outcome of perk points generated (I suspect/think/guesstimate you get 2/3 credit landed and 1/3 credit ditched or ~50% for the drone you lost). The math is actualy easier if you loose one drone pre-drop - it didn't make it, it didn't drop (33% of your total potential damage-inducing capacity), you do not collect 1/3 of $200 after passing Go.
4 - Lusche again has the bread a butter for ya on it. I recommend not gunning (or taking on a gunner) with a drastic/notable difference in connection speed/quality: IE - gunner and pilot have high-speed internet, one lives east coast and the other west, both have a ping to the server of ~50ms - they will have better results than if the high-speed east coast player joins up with a 56k user in Oklahoma or Australia.
With shore batteries or ship guns, you should read up on how to toggle through the different aiming modes available to make it easier to learn from the get-go (Land Mode - tracks to a set position regardless of ship movement, Sea Mode - tracks to a set position in relation to the ship (and its movements), and Free/Normal mode.). Also note some big guns have different loadouts of AA or HE, and 88s AA rounds need to be manualy fused/adjusted to detonate after a specific distance of travel (5" naval guns have proximity fuses

).
5 - Rearm pads will reload your main/single buff and any undamage defensive guns (it will reload all of them, but they remain out of operation if knocked out). You can land with two drones, rearm, and takeoff without them - but your drones will not land after staying behind, they will eventualy disapear and it will effect your score as if you flew out of range and ditched them.
On small fields only 1 rearm pad is available. Off the runway near the VH side.
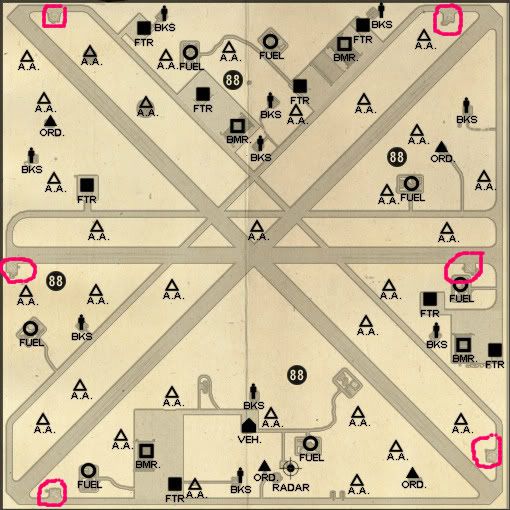
There is one rearm pad located at the end of each runway (and each runway has two ends). They are always available (under friendly control) and undestroyable. Here's some good images someone worked up a while ago (I believe thanks to RipRap from this thread
http://bbs.hitechcreations.com/smf/index.php?topic=330311.0 ).
At small fields they're square pads (with "RE-ARM" painted on them) located on the VH side of the runway, about 100 yards off the runway down two long-curved taxiways leading to each (my favorite rearm pads because of this design element) about 100 and 200 yards from the ends. I would not recommend them to a "newbie" for rearming the very largest buffs, but practice makes perfect (use rudder and C/V keys for L/R brake). One has a large shack on the edge of the pad that is an added challenge, and the other has a lesser-sized shack that can still be tricky since most buff wingtips will fit over it with but barely with only having to get one of your main gears on to initiate the rearm process (30-seconds, pay attention to the text buffer for when you're on it and when you're ready to go).
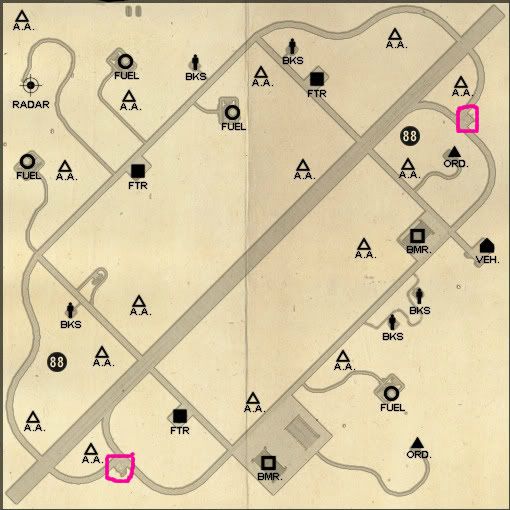
Medium fields is where practicality and convenience starts to show with rearm pads and their location and layout. Note, the "short" runway at medium and large fields is only about the length of the single main runway at small fields. The rearm pads also at the ends of these short runways features those same larger-shacks next to the pad for an aditional challenge of landing and taking off on the "short" runway wasn't enough for ya in heavies. The pads on the main runway though are each different - one is "typical" with the medium-large shack, but the other has a different layout of shorter shacks along the pad, much more open and much easier to access with a very large buff.
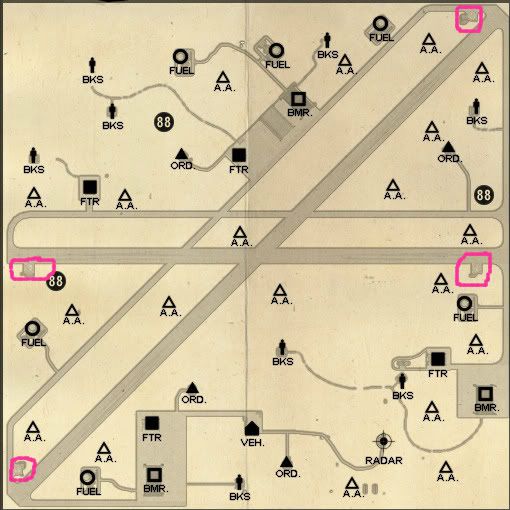
Large fields follow the same scheme introduced with medium fields - short runways have rearm pads right on them, but that are relatively crowded compared to the ones provided more with buffs in mind at the end of the two main runways.