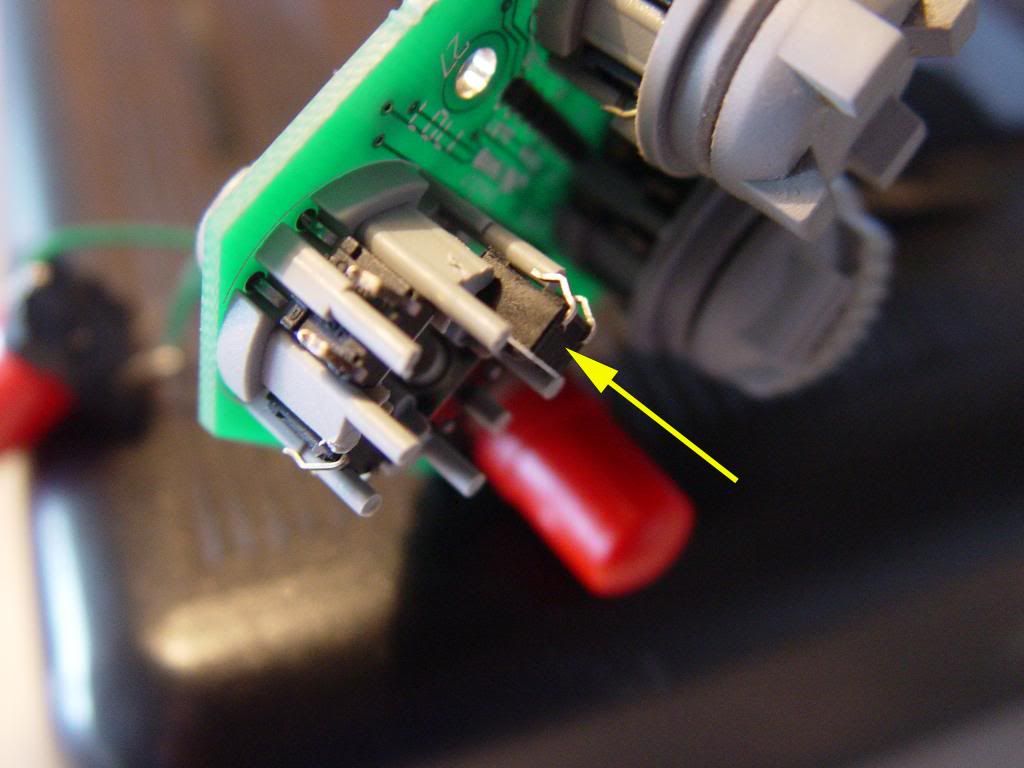
Author Topic: CH Hat Switch Repair  (Read 4917 times)

Offline nrshida

  • Plutonium Member
  • *******
  • Posts: 8492
CH Hat Switch Repair
« on: November 04, 2013, 01:30:24 PM »
Introduction

If your CH stick and /or throttle is getting on a bit and you've been doing your SA properly, then the chances are at least one of your views assigned to your hat switch is becoming difficult to reach: needing a lot of pressure, or flicking in and out of view or just not working at all.

My Fighterstick is approximately three years old and the check six position on my hat switch was becoming rather inaccessible, needing a lot of force and only intermitently working. I had hoped to avoid this job as I am making a custom stick, but it's not ready yet and prompted by a friend in a similar position I decided to effect a repair.

Here is a comprehensive pictorial tutorial. Do not be put off by the length or amount of pictures, I have tried to make it accessible to players of all levels of repair skill. The repair took me a leisurely one and a half hours including making all of the photographs and some other jobs in between.

I am obliged to say that I am not responsible for anyone damaging their equipment, CH or biological in following this guide. Do so at your own responsibility. If you perform the same tasks I did you can reasonably expect the same outcome: a functional hat switch once again.

I suggest you read through the guide before starting and secure the necessary tools and spares.


Dissasembly

First unplug your stick from the computer.

Turning the Fighterstick onto its left side reveals the screws which secure the handle halves together. There are six of these the positions of which are indicated by the yellow arrows here:


They are identical so no need to worry which one came from where. Find a screwdriver which fits properly and remove or unscrew them all. Two of mine wouldn't come out of the right hand casing but no matter, as long as they are disengaged from the left side casing they will come away when you separate the halves.

Grasping both halves of the stick body, begin to wiggle and separate them from each other. At this point:


Just push the switch panel to the left so it stays attached to the left casing. Pull off the right casing and lay it to one side. It makes an effective container for screws and the other parts we will be removing.

Carefully wiggle out the switch panel and then slide the trigger button out of its slot. Just take a little care as the wires are thin and we don't want to break those. Pull out the red trigger and lay it to oneside. The long red pushbutton will probably also plop out at this point.


Turning the switch panel over shows six screws. Using the same screwdriver, remove the three marked with the arrows.


This will allow you to pull the black fascia panel off revealing the hat switches underneath. The hat switch with the cooley top is the one we are most likely interested in, it is to the side of the red pushbutton.


Turn the panel over and carefully remove the screw which holds the hat switch securing washer in place.


Then pull out the hat switch. Set the screw with the washer and the hat aside. Next we are going to remove the cover so we can check the switches. Observe the shape of the aperture:


The cover is held in place by friction on top of four pins. Place a thin terminal screwdriver into the gap thus:


And give it a slow, tiny twist. This corner of the cover will lift off, revealing the pin.


Do the same opposite and on the other corners until you can pull the cover off easily. Set it aside.


Happy Friday Pipz!
-=Army of Muppets=-
"Get stuffed Skyyr, you freak" - Zack1234

Offline nrshida

  • Plutonium Member
  • *******
  • Posts: 8492
Re: CH Hat Switch Repair
« Reply #1 on: November 04, 2013, 01:32:59 PM »
Diagnosis

By now we are able to see the four tiny switches which provide the hat switch one each for fore, aft, left and right, and a combination of pairs for the corners:


Let's now test the blighters. Make sure your tools are to one side to prevent short circuits and then plug your stick in. Get the windows peripheral program working, the one you use to calibrate the stick outside of the game (I'm afraid I don't know what it's called), or a peripheral diagnostics tool if you use one of those. I use a Mac and have a program called: 'Joystick and Gamepad Tester' which I found when I made my throttle, but anything which lets you see how the computer experiences the switches will do.

Take your phillips screwdriver and depress the little buttons in turn. With my stick the six view switch was dead, no click under pressure, like it was permanently depressed. The other three worked fine. I decided to replace the switch with a new one.

If your switches work, skip through the next section and go to Cover Modification.


Switch Replacement

It would be logical to replace all of the switches if one of them is dead. The reasoning being that if one if worn out, the others might not be that far behind. I didn't do this because I was in a hurry and expect to shortly replace this stick anyway. Also it simplifies the tutorial.

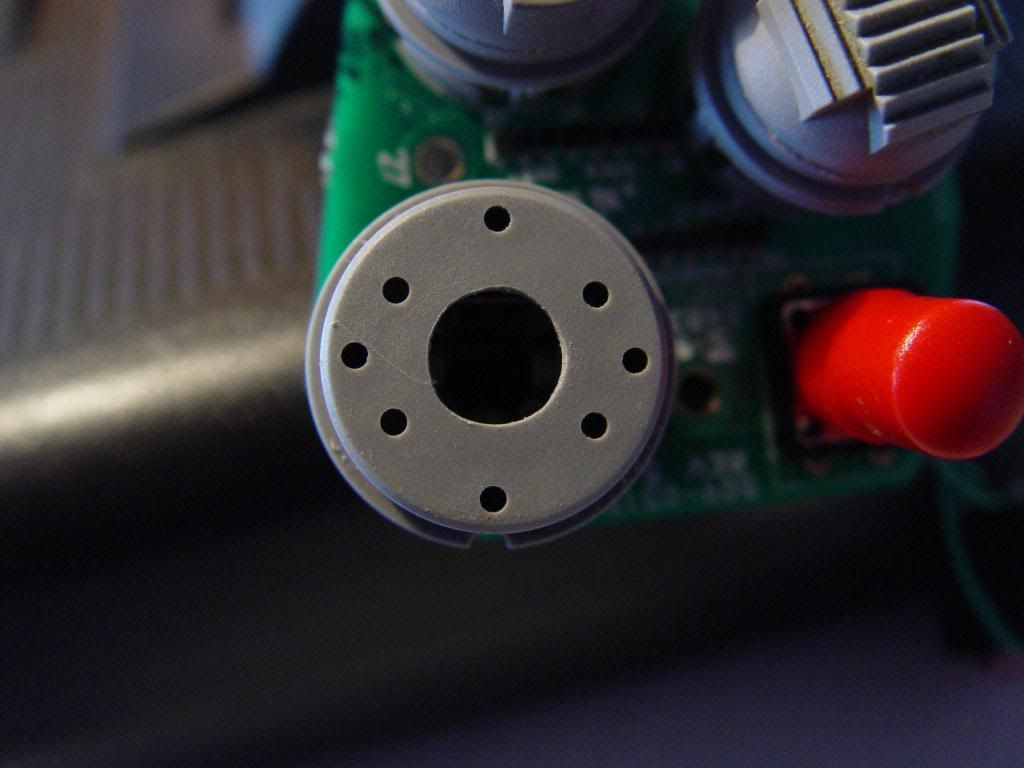
The switches are pushed through a rail in the grey plastic, and held in position by having the two pins soldered in place. These are the two positions on the circuit board for these pins. This picture was made after I had removed the switch:


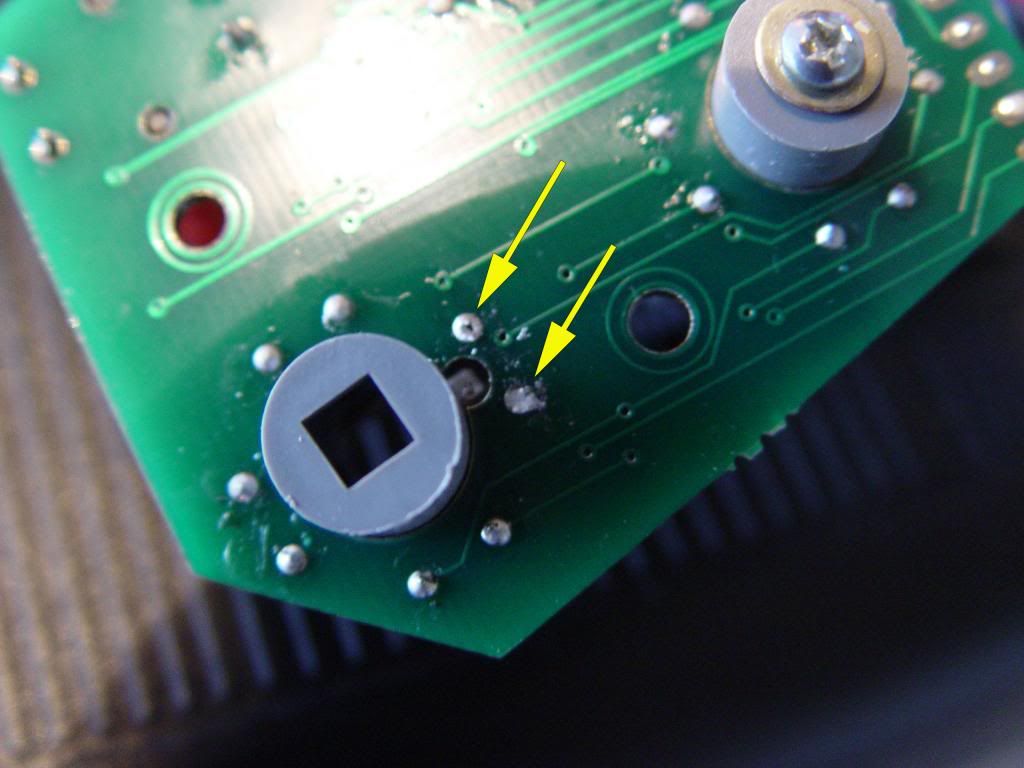
Do not worry if the solder does not clear leaving two small holes on the circuit board. We will re-use that solder later.

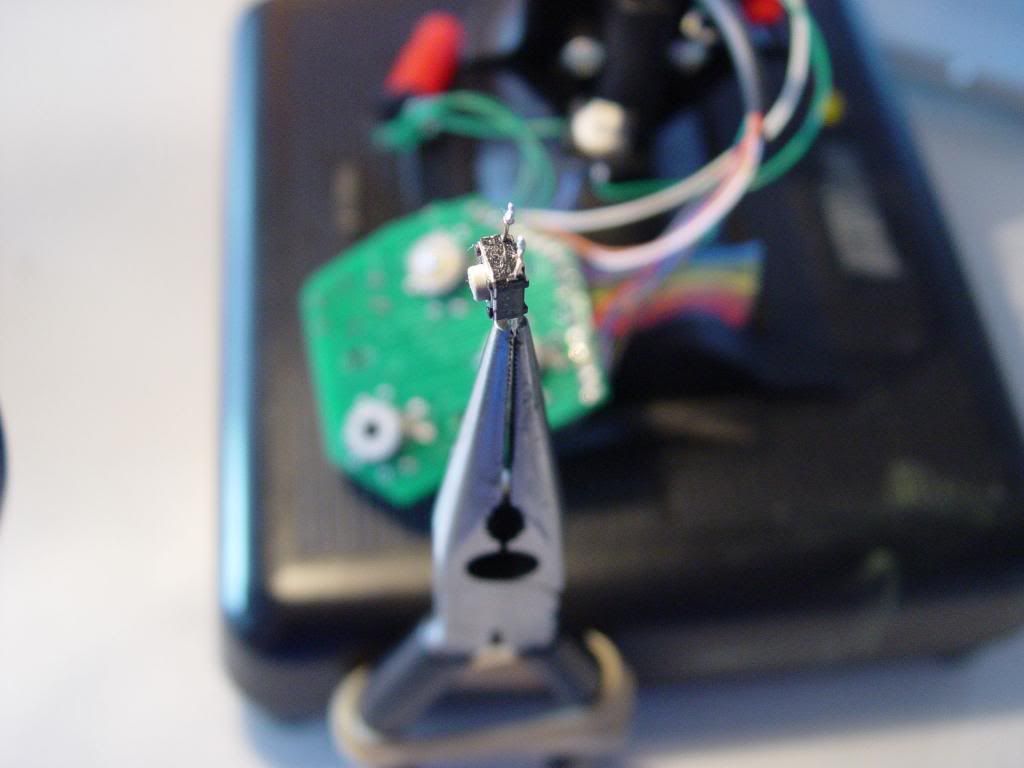
I didn't have a desoldering gun to hand anyway (which is the normal tool to remove the molten solder completely), and since you must release both soldered pins simultaneously, I improvised a way to remove it. I bent to unused pins straight out and used a pair of pliers with a rubber band wrapped around the handles as a sort of clamp-on weight, hanging the pliers off the pins. Then I turned the panel upside down and applied heat to the soldered joins, first heating one, and then flicking between them both. With a satisfying thunk, out came the switch and pliers together.


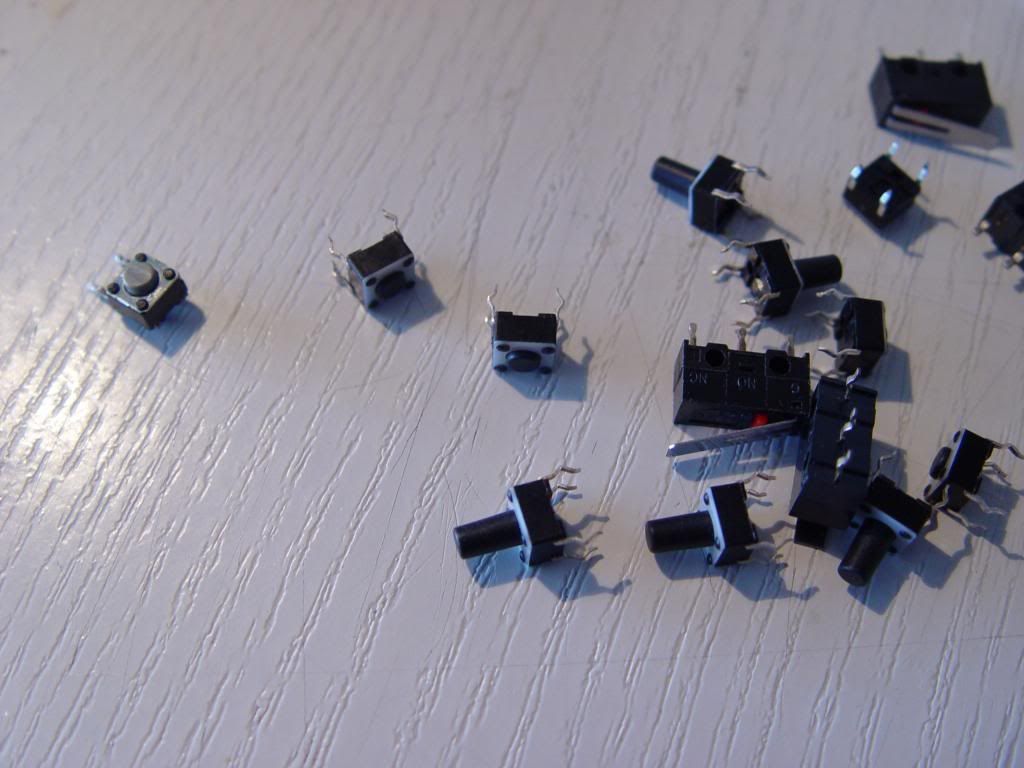
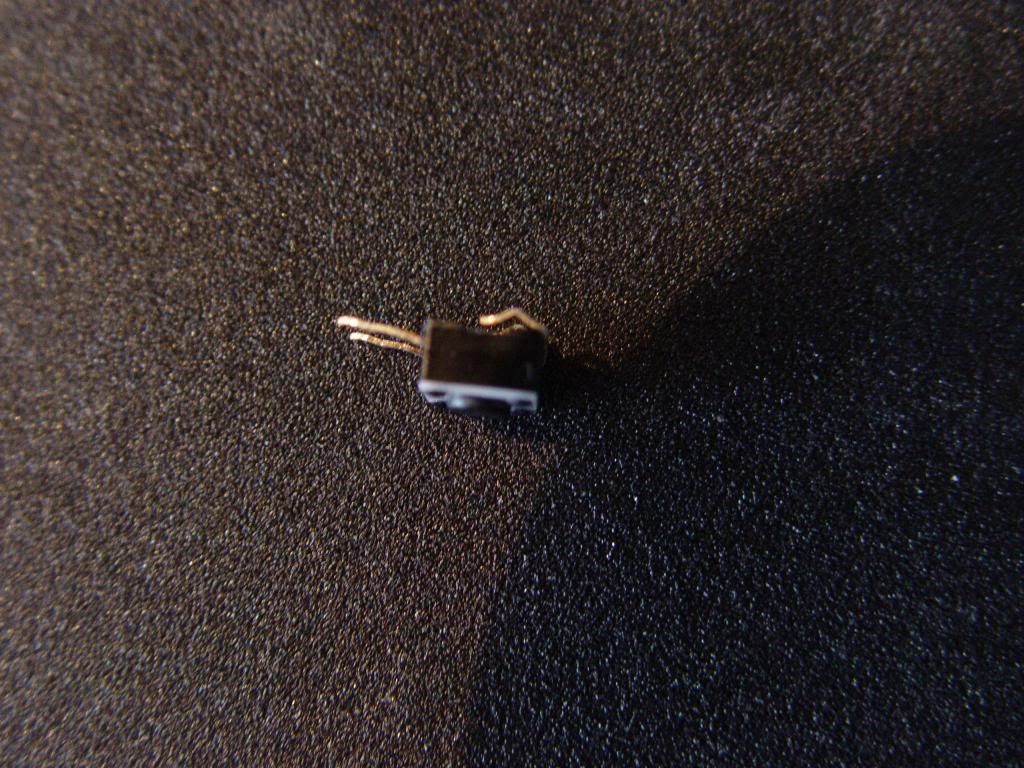
Here's the little rascal. you can just see a conical area of wear on the swtch. This accounts for the dust you will most likely find on the shaft of the hat. These switches contain a dished metal disk which both gives you the click feel as well as the spring and contact. Dirt, plastic dust, arcing and general wear is usually the cause of your problems:


I had a similar switch in my stock, but they can also be bought at the Radio Shack in America I understand and online from electronics suppliers. If the cylinder which protrudes is shorter than the original you ought to superglue a thin piece of metal or hard plastic on until it is the same length. I didn't do this and had to make a more complex workaround later.


Bend the pins like this, take any kinks out of the straight ones with pressure from a pair of pliers. Bend the unwanted ones over, just like the original.


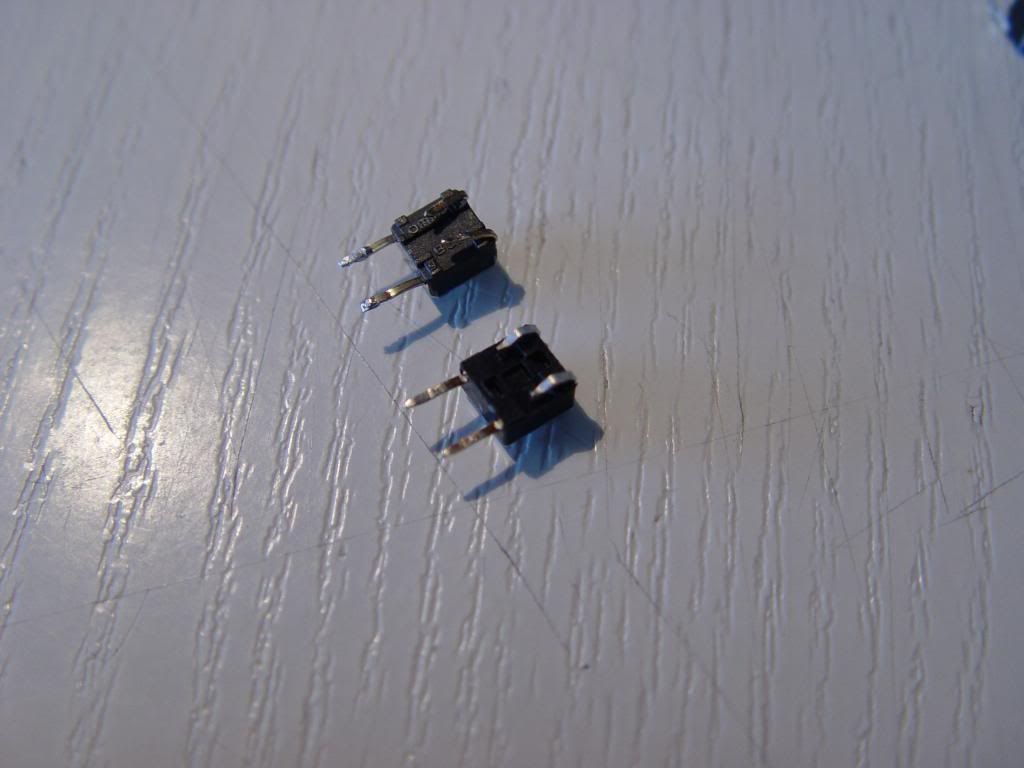
This is the approximate angle viewed from the side (sorry about the focus in this shot):


Now gently push the switch into place.


Flip the board over and apply heat to both of the solder joints in turn so they both get hot together. With a bit of fiddling around, the switch will be seated in the bottom and be soldered in place. You will see the new pins slightly sticking out the circuit side. Ensure the replacement switch is at the same depth as the others. If it doesn't go in easily your pins probably need adjusting.

Now we must check our work before we go further. Repeat the test above by pushing the switch with a screwdriver and see if the computer sees it. If it does your soldering has been successful. If not remove and try again.
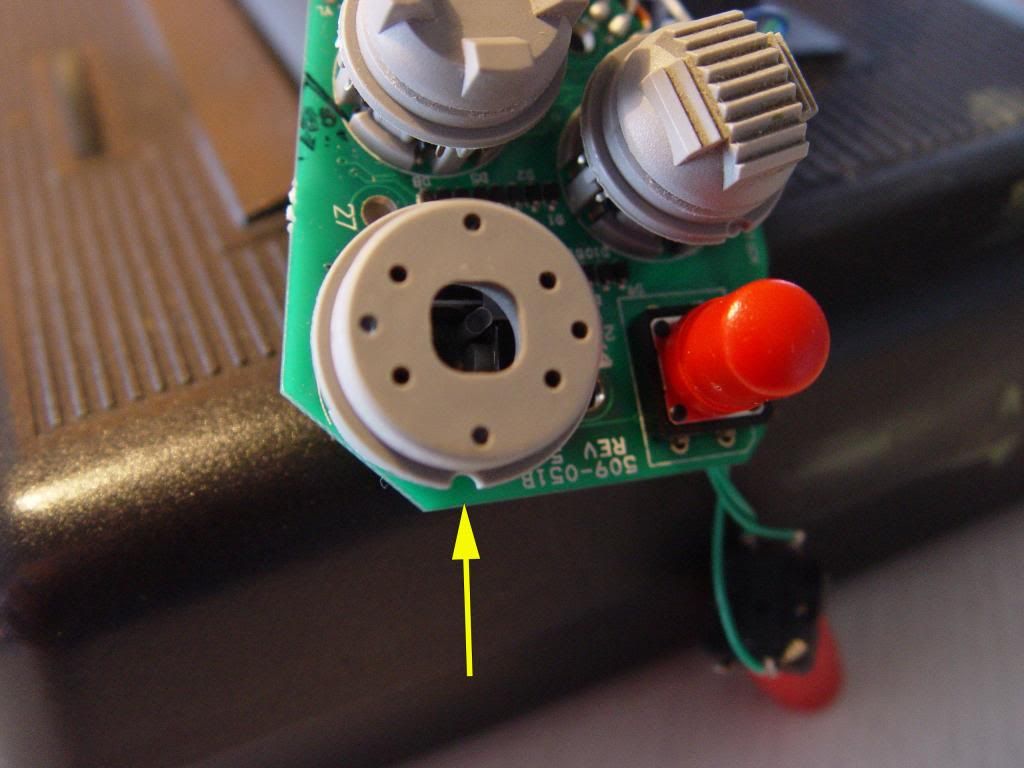

Cover Modification

When I put the cover back in place and tested the switches with the hat pushed in, the computer did not see the switch activation. In my case this was because my switch was a tiny bit lower, but could also be because of wear on the hat switch shaft too. I widened the cover until the computer saw the inputs with the cover and hat switch in place. You may have to do this too if the switch works with the cover off, but not with the cover on.

A sharp craft knife is best as the plastic is soft. Don't do too much, shave a bit, test it, repeat. Take some time to get this right.

This is what mine looked like part way through:


When replacing the cover align in thus (picture pre-modification):


Push it gently on without letting it tilt over it and make sure it is pushed down to the stops.

Once the hat is working fine and all eight positions on the hat are easily accessible, it is time to re-assemble.


Happy Friday Pipz!
-=Army of Muppets=-
"Get stuffed Skyyr, you freak" - Zack1234

Offline nrshida

  • Plutonium Member
  • *******
  • Posts: 8492
Re: CH Hat Switch Repair
« Reply #2 on: November 04, 2013, 01:38:05 PM »
Reassembly

It is customery to leave one's readers hanging at this point by saying refitting is the reversal of removal, which is pretty well true. However there are one or two points to be careful about so let's run through those.

The screws used by CH are essentially self-tappers, meaning they cut their own thread as you screw them in. When the  joystick was assembled therefore the threads were already made. Sometimes if you inspect the thread you can see a tiny spiral of plastic. These are from initial assembly at the factory.


Pinch the screw thead between your fingers and then screw it backwards with the screwdriver to remove those.


The trick with self-tappers is to reuse the thread which is already there. How you find it is to hold the screw in place with the screwdriver and with virtually no pressure, turn the screw backwards until you hear, feel or see a little click or drop. This means the lead of the screw will re-engage with the original thread. Now do up the screw but do not overtighten as you might strip the thread.

Now replace the hat switch securing screw.

Find these three screws:


Put the black fascia panel back on and screw it into place. Same procedure with the self-tappers.

Now find your trigger button which is hanging in the wires there somewhere. Slide it back into its rail, the terminals and wires go left to right.


Now slowly slide the hat switch panel back into position, being careful not to stress and break any wires.


Now find the index finger red switch and similarly put that back into its mounting.


If it is difficult you are doing it wrong, it should slide in easily. The wires for this switch run fore and aft.


Now wriggle your trigger back into position and test it gives a click.


Check the routing of all of the wires now. We do not want any pinched or scewered by a screw on reassembly. Just push them into a safe position and they shoud stay there. Make sure none of them are tight.

Now offer up the right side of the handle casing. Get the red index finger switch in first and then wriggle the trigger until it finds its pivot hole. Finally align the casing with the hat switch panel. With some gentle wobbling and sliding it should go back together easily. If you feel any resistance, stop! Something is obstructing. Take the casing off and recheck everything inside.


This should only leave you with six long black screws (five in the photo because one remained in the casing). These hold the handle casings together. Screw them back in one at a time, observing the same procedure for self-tappers. Do not tighten them up until they are all in place and do not over tighten them, it is not necessary.


My hat hung perhaps one millimeter lower than it was when new but that is to be expected because I used a shorter switch and butchered my cover quite a lot for clearance. Regardless all eight views are now working easily and reliably and I cannot feel a difference when using the hat switch.


I hadn't realized how bad it was until I repaired it and tested it. Dreamy.


Happy Friday Pipz!
-=Army of Muppets=-
"Get stuffed Skyyr, you freak" - Zack1234

Offline nrshida

  • Plutonium Member
  • *******
  • Posts: 8492
Re: CH Hat Switch Repair
« Reply #3 on: November 04, 2013, 01:42:12 PM »
Conclusion

If your stick is out of warranty and your hat switches (or any other switches) are giving you trouble, I would suggest your options are limited anyway so why not have a try at a repair before discarding and replacing the whole stick.

It is difficult to determine the level of difficulty without knowing what your skill level is. However I should say this isn't a difficult task for anyone who can work carfully and is reasonably dextrous. If you have a severe case of sausage fingers then find someone you know who is and ask them to help you. They should be able to follow this guide even if they know nothing of joysticks.

If you can't solder then why not learn. There are excellent tutorials on YouTube and a soldering iron need not be expensive. If you learn to solder you will certainly use it again. I would class the soldering skills needed for this job as basic. Like with most soldering, it is the need for three hands which usually makes it tricky (hence the pliers and rubber band trick).


I am sorry to those who wish to repair the CH throttle. I do not own one of those so I cannot help you with a pictorial guide of the disassembly. I am fairly certain the hat switches will be the same and if you have understood this procedure then you should have little trouble adapting to the throttle. Make pictures as you go in case you need to refer to how something was when assembled is a good tip.


It would be very helpful feedback for me to know if anyone actually uses such a guide and if it was easy to follow. It takes a fair bit of effort to make one of these but it's the best I can do since dropping round with my tools is usually out of the question (although I do work for food).

If anyone has any specific questions please post them here and I will try to answer them or even supply more pictures or another specific guide. This way everyone benefits.

Please let me know and good luck with your repairs.

 :salute


Tools Used in This repair

Soldering iron - only a cheap one.
Small Phillips screwdriver.
Small flat-bladed terminal screwdriver.
Sharp craft knife: Swan Morten No 3 handle with No 11 bade, an Exacto knife would also suffice.


Replacement Parts

One replacement momentary switch.
Happy Friday Pipz!
-=Army of Muppets=-
"Get stuffed Skyyr, you freak" - Zack1234

Offline potsNpans

  • Nickel Member
  • ***
  • Posts: 667
Re: CH Hat Switch Repair
« Reply #4 on: November 04, 2013, 09:32:31 PM »
Well done,I love a good how to fix it report. I could see this start out a new bbs hardware/ do it your self knowledge sub-section. Does CH post schematics and part specs.? :cheers:

Offline nrshida

  • Plutonium Member
  • *******
  • Posts: 8492
Re: CH Hat Switch Repair
« Reply #5 on: November 08, 2013, 04:09:15 PM »
Well done,I love a good how to fix it report. I could see this start out a new bbs hardware/ do it your self knowledge sub-section. Does CH post schematics and part specs.? :cheers:

Hi Pots! Thank you, hope you are well.

I'm afraid I have been unable to find the manufacturer of those exact pushbuttons. If I have time I will make some precise measurements. The general size and format seems standard, it's just the distance the cylinder sticks out is quite important.

Happy Friday Pipz!
-=Army of Muppets=-
"Get stuffed Skyyr, you freak" - Zack1234

Offline Bruv119

  • Aces High CM Staff
  • Plutonium Member
  • *******
  • Posts: 15644
      • http://www.thefewsquadron.co.uk
Re: CH Hat Switch Repair
« Reply #6 on: November 08, 2013, 04:12:32 PM »
excellent write up Shida.
The Few ***
F.P.H

Offline nrshida

  • Plutonium Member
  • *******
  • Posts: 8492
Re: CH Hat Switch Repair
« Reply #7 on: November 08, 2013, 04:14:39 PM »
Thank you I hope it helps someone.
Happy Friday Pipz!
-=Army of Muppets=-
"Get stuffed Skyyr, you freak" - Zack1234

Offline DREDIOCK

  • Plutonium Member
  • *******
  • Posts: 17773
Re: CH Hat Switch Repair
« Reply #8 on: November 10, 2013, 12:25:17 PM »
Yanno this just got me thinking. Would it be possible to replace the useless microstick on the throttle with a hat?
I could use an extra hatswitch. To date I have found no useful purpose for the microstick
Death is no easy answer
For those who wish to know
Ask those who have been before you
What fate the future holds
It ain't pretty

Offline Drano

  • Platinum Member
  • ******
  • Posts: 4086
Re: CH Hat Switch Repair
« Reply #9 on: November 10, 2013, 06:26:14 PM »
Yanno this just got me thinking. Would it be possible to replace the useless microstick on the throttle with a hat?
I could use an extra hatswitch. To date I have found no useful purpose for the microstick

I set my micro stick up to work like a hat stitch using the CH software. Just assigned the key command I wanted to that position and adjusted the sensitivity so it needed a good bit of travel. In effect a  very large dead band.
"Drano"
80th FS "Headhunters"

S.A.P.P.- Secret Association Of P-38 Pilots (Lightning In A Bottle)

FSO flying with the 412th Friday Night Volunteer Group

Offline Drano

  • Platinum Member
  • ******
  • Posts: 4086
Re: CH Hat Switch Repair
« Reply #10 on: November 10, 2013, 06:27:55 PM »
Oh and great writeup, shida.  :aok
"Drano"
80th FS "Headhunters"

S.A.P.P.- Secret Association Of P-38 Pilots (Lightning In A Bottle)

FSO flying with the 412th Friday Night Volunteer Group

Offline AdmiralDecker

  • Zinc Member
  • *
  • Posts: 1
Re: CH Hat Switch Repair
« Reply #11 on: August 12, 2021, 09:00:37 PM »
As I've replaced many of these tactile switches, here's some info for those interested:

The switches for this model 4-way / 8-way hats as well as Classic FlightStick, FlightStick Pro, and several others, is Omron Part # 83F-1022
6mm x 6mm footprint, 5mm height, gray push-button, w/no shield.

See the exact Digikey item here:
https://www.digikey.com/en/products/detail/omron-electronics-inc-emc-div/B3F-1022/44674

Digikey part #  SW403-ND


Offline Oldman731

  • Plutonium Member
  • *******
  • Posts: 9342
Re: CH Hat Switch Repair
« Reply #12 on: August 12, 2021, 09:34:58 PM »
Oh and great writeup, shida.


Agreed.  Thanks!

- oldman (how is TinyShida doing?)

Offline Ack-Ack

  • Radioactive Member
  • *******
  • Posts: 25260
      • FlameWarriors
Re: CH Hat Switch Repair
« Reply #13 on: August 13, 2021, 01:01:25 PM »
Yanno this just got me thinking. Would it be possible to replace the useless microstick on the throttle with a hat?
I could use an extra hatswitch. To date I have found no useful purpose for the microstick

You can create a script in Control Manager that will disable the analog mini-stick and allow you to set the mini-stick as an 8-way hat switch. 
"If Jesus came back as an airplane, he would be a P-38." - WW2 P-38 pilot
Elite Top Aces +1 Mexican Official Squadron Song

Offline Eagler

  • Plutonium Member
  • *******
  • Posts: 17617
Re: CH Hat Switch Repair
« Reply #14 on: August 13, 2021, 03:26:06 PM »
Great info and tips!

Eagler
"Masters of the Air" Scenario - JG27


Intel Core i7-13700KF | GIGABYTE Z790 AORUS Elite AX | 64GB G.Skill DDR5 | EVGA GeForce RTX 3070 Ti FTW3 | Vive Pro | Warthog stick | TM1600 throttle | VKB Mk.V Rudder Pedals