Author Topic: Sheperds SIM PIT  (Read 16966 times)

Offline guncrasher

  • Plutonium Member
  • *******
  • Posts: 17361
Re: Sheperds SIM PIT
« Reply #45 on: May 04, 2010, 02:06:37 AM »
seeing your pictures and decided to build my own.  Since i love the spit8 so much, i am gonna build a replica, I am starting slow, but I thought I would start with my trakir first then move to the rest.  see what you think

semp

« Last Edit: May 04, 2010, 02:08:35 AM by guncrasher »
you dont want me to ho, dont point your plane at me.

Offline zack1234

  • Plutonium Member
  • *******
  • Posts: 13214
Re: Sheperds SIM PIT
« Reply #46 on: May 04, 2010, 04:27:58 AM »
How did you get it to look so real? :old:
There are no pies stored in this plane overnight

                          
The GFC
Pipz lived in the Wilderness near Ontario

Offline sheperd

  • Copper Member
  • **
  • Posts: 145
Re: Sheperds SIM PIT
« Reply #47 on: May 04, 2010, 06:55:47 AM »
WOW Tink, nice use of that tinker ability!
If you are serious about the spit pit check this guys build out!

http://www.simhardware.org/index.html
I can build em better than I can fly em
http://s691.photobucket.com/albums/vv272/hotwire_2009/?

Offline Reschke

  • Platinum Member
  • ******
  • Posts: 7724
      • VF-17 "The Jolly Rogers"
Re: Sheperds SIM PIT
« Reply #48 on: July 15, 2010, 01:27:19 PM »
I just posted this in another thread but this simpit linked here is quite possibly the most economical that I have seen and would fit perfectly for all the things that I want in a simpit station. Plus it looks like it would give possible upgrades and additions easy access.

http://www.youtube.com/watch?v=i-rjs7-CJ3o#lq-lq2-hq-vhq-hd

http://www.simracingworld.com/phpBB/viewtopic.php?f=18&t=33506
« Last Edit: July 15, 2010, 01:32:30 PM by Reschke »
Buckshot
Reschke from March 2001 till tour 146
Founder and CO VF-17 Jolly Rogers September 2002 - December 2006
"I'm baaaaccccckkk!"

Offline Baumer

  • Silver Member
  • ****
  • Posts: 1739
      • 332nd Flying Mongrels
Re: Sheperds SIM PIT
« Reply #49 on: July 15, 2010, 05:44:58 PM »
Looking good Sheperd! I just finished updating mine with a new set of panels on the right side.


Of course that means I can now redo the left side like I want! LOL I just need to build a good set of levers for a few things like Gear / Flaps / Tailhook / Dive Breaks. Anyone have a good set of plans (or design) for building levers with some resistance to them?

HTC Please show the blue planes some love!
F4F-4, FM2, SBD-5, TBM-3

Offline morfiend

  • AH Training Corps
  • Plutonium Member
  • *******
  • Posts: 10447
Re: Sheperds SIM PIT
« Reply #50 on: July 16, 2010, 01:49:23 PM »
 Baum,your resistance levers got me thinking and I may have an idea you can use.

 The next time your at your local HomeRipoff store,go to the kitchen cabinet area and check out the "european hinges"

 These are simply hidden hinges used on frameless kitchens,anyways they have several types of "soft close" and retract type of hinges that use small "hydralic cylinders" that you might be able to adapt to the levers for use as resistance.

 Or you could just search the net for these types of hinges and see if they'd be of any use.

 BTW the new panel looks great,makes my bentwood chair look real oldschool now.... :lol

   :salute

Offline Baumer

  • Silver Member
  • ****
  • Posts: 1739
      • 332nd Flying Mongrels
Re: Sheperds SIM PIT
« Reply #51 on: July 16, 2010, 09:33:08 PM »
Thanks Morf I'll look for them.

HTC Please show the blue planes some love!
F4F-4, FM2, SBD-5, TBM-3

Offline sheperd

  • Copper Member
  • **
  • Posts: 145
Re: Sheperds SIM PIT
« Reply #52 on: July 19, 2010, 12:13:21 PM »
If you look in this pic
I used a chain link fence tension rod and painted pingpong balls filled with spray foam crack and crevis insulation to secure them to the rod + it gives them a more realistic feel. the tension is provided by springs and I use a "break over center method" to lock them in position.
« Last Edit: July 19, 2010, 12:16:41 PM by sheperd »
I can build em better than I can fly em
http://s691.photobucket.com/albums/vv272/hotwire_2009/?

Offline InCrypt

  • Copper Member
  • **
  • Posts: 111
      • My personal Website.
Re: Sheperds SIM PIT
« Reply #53 on: July 20, 2010, 10:43:44 AM »
Wow! Compared to you guys I'm just a wee beginner!
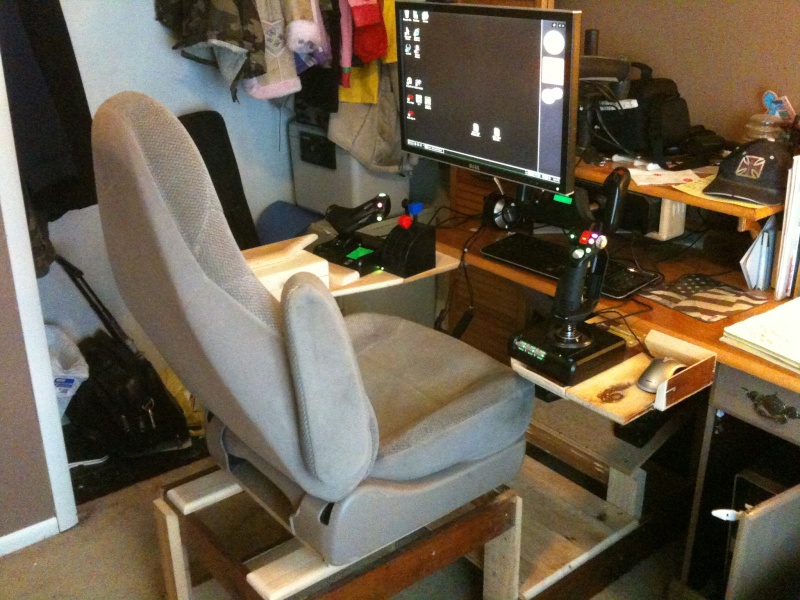


The seat is from a  2002 Dodge Minivan that I got from a You-Pull-it Junk yard for $15 bucks. I built the "sled", as I call it, from 1x6 I had left over from a home renovation project. (Explains why some of it is stained) The monitor is so close to my face because I'm legally blind (20/200 vision corrected) which makes getting the angles for the Track IR camera (on top of the monitor) a little tricky. The Stick/mouse platform is on a hinge and tilts up to facilitate entering and exiting the flight system.
All of the flight gear, with the exception of the Track IR system, is Saiteks. Saitek X-52, Saitek Pro-flight Rudder Peddles, and Saitek Pro-flight Yolk. The last, the yolk, Is still something I'm working on. It was originally installed when I was using a regular office chair. But it's too far forward to use in the present cockpit configuration. And if I bring it forward so it can be used, it will interfere with getting in and out of the chair. I'm still working on a system where-by I can bring it forward when I want to use it, and push it back and out of the way when I don't. For now, I'm only using the throttle quadrant.
The X-52 stick controls throttle and is part of my HOTAS (Hands on Stick and Throttle) configuration. The black lever in the throttle quadrant is for propeller pitch, the blue is not used, and the red - not seen in some pictures, is used for elevator trim - rudder and aileron trim are the slider and thumb wheel on the X-52 throttle respectively.
When I'm in a two engine aircraft, however, like a B-25 or P-38, I used Control mode 3 which changes things up a bit. The X52 throttle and Black lever on the throttle quadrant become left and right throttles respectively. And the blue and red throttle levers become left and right RPM respectively. Elevator trim is transferred to the top wheel on the X-52 (not as fine a control as the lever) and elevator and rudder trim stay the same.
It may be a bit much, but it's the virtual cockpit I've been dreaming of for over 20 years now... Hope you enjoy, and let me know if you have an questions.

InCrypt out...


Rudder Peddle Platform - at an angle to make the peddles feel more natural


X-52 throttle and Yolk Throttle quadrent


X-52 Stick and mouse Platform. this is hinged to facilitate entering and exiting the cockpit.

The above was a post I shared with my suqadies on our own website. I didn’t realize that there were so many fine Pit builders in AH. I know what you mean though, about it never ending. The computer has moved out of the cabinet you see in the Pix above. It’s got its own shelf under the throttle controls now. The keyboard has move to a swivel carriage that I can pull down when needed.
Next I want to move the Yolk onto some kind of locking draw hinge/slide so I can pull it forward when needed, and push it out of the way when I don’t. An alternate is to try and get the pivot mechanism for a steering wheel out of a car. I also want to use pop rivets and flashing to simulate skin metal, and I want to add a rumbler to the seat that I can either run sub-woofer signals, or, so I’ve read about, tap the signal from a force-feed back stick (Which I currently don’t have) so I can get the ‘feel’ of the plane.
I’ve got ideas, lots of ideas, but right now I’m enjoying flying more then building. ;). Hell, I’ve still yet to add paint!
Buddist proverb: "When the Student is ready, the teacher will appear."

Since I have no teacher I know I'm still working on being ready...

Offline InCrypt

  • Copper Member
  • **
  • Posts: 111
      • My personal Website.
Re: Sheperds SIM PIT
« Reply #54 on: July 23, 2010, 02:47:11 PM »
Well, After 7 months of playing Aces High I’ve finally got my Yolk into play! I was able to recycle the old bracket – which held the yolk to the old monitor table – and incorporate it into a new dedicated table mount bracket. I even went the extra step of painting these parts (Some thing I have to do to the rest of the sim-pit.
I inherited this “Book Holder” from my grandfather. It was something that he made him self and was meant to hold a book for you while you were sitting in a chair. Well, I adapted that to hold my keyboard instead. I went into my old computer parts bin and fetched out an older USB keyboard and now have that mounted above my monitor for easy access. It even make’s hitting critical buttons during flight like reaching up to the overhead console in a C-47!

The pit’s is starting to take form, but it’s still in a Mock-up phase. Next steps will be to paint it, skin it in aluminum skin, and ultimately crate a “helmet” with the headphones, microphone, Track-IR and a set of video goggles, to replace the monitor, all mounted in one device. In the mean time, for your viewing pleasure…


Click on images to enlarge:


This was an early mockup with the primary keybard located to the left of the screen. This made typing a bit difficult. Plus it was hard for my blind eyes to see the 1 and 2 for switching between gunner and Driver in an M3


Another view of the Mockup while I play-tested last night. You can see everything being held togeather by clamps ;)
Buddist proverb: "When the Student is ready, the teacher will appear."

Since I have no teacher I know I'm still working on being ready...

Offline Reschke

  • Platinum Member
  • ******
  • Posts: 7724
      • VF-17 "The Jolly Rogers"
Re: Sheperds SIM PIT
« Reply #55 on: July 23, 2010, 11:05:47 PM »
Was going to suggest that you could mount the yolk on something like a swing arm that locked or a keyboard type tray that came out from underneath the monitor somehow.
Buckshot
Reschke from March 2001 till tour 146
Founder and CO VF-17 Jolly Rogers September 2002 - December 2006
"I'm baaaaccccckkk!"

Offline InCrypt

  • Copper Member
  • **
  • Posts: 111
      • My personal Website.
Re: Sheperds SIM PIT
« Reply #56 on: July 31, 2010, 05:21:20 PM »
Paint Does Wonders!


Buddist proverb: "When the Student is ready, the teacher will appear."

Since I have no teacher I know I'm still working on being ready...

Offline MADe

  • Silver Member
  • ****
  • Posts: 1117
Re: Sheperds SIM PIT
« Reply #57 on: August 04, 2010, 10:21:23 PM »
WOW
Cool Rigs. I built myself a full scale spitfire stick, P51 rudder pedals, and a throttle unit. My other puter is down and it has the pics. I will post them at some point.
I chose to put my efforts into a sim pit that puts my body thru the actual cockpit movements. Only thing I have not done is bolt a woofer to seat for vibration effects. lol

Oh Yes I fly with them.
ASROCK X99 Taichi, INTEL i7 6850@4.5GHz, GIGABYTE GTX 1070G1, Kingston HyperX 3000MHz DDR4, OCZ 256GB RD400, Seasonic 750W PSU, SONY BRAVIA 48W600B, Windows 10 Pro /64

Offline MADe

  • Silver Member
  • ****
  • Posts: 1117
Re: Sheperds SIM PIT
« Reply #58 on: August 06, 2010, 03:13:17 PM »
ASROCK X99 Taichi, INTEL i7 6850@4.5GHz, GIGABYTE GTX 1070G1, Kingston HyperX 3000MHz DDR4, OCZ 256GB RD400, Seasonic 750W PSU, SONY BRAVIA 48W600B, Windows 10 Pro /64

Offline MADe

  • Silver Member
  • ****
  • Posts: 1117
Re: Sheperds SIM PIT
« Reply #59 on: August 08, 2010, 03:57:39 PM »


My stick
« Last Edit: August 08, 2010, 03:59:25 PM by MADe »
ASROCK X99 Taichi, INTEL i7 6850@4.5GHz, GIGABYTE GTX 1070G1, Kingston HyperX 3000MHz DDR4, OCZ 256GB RD400, Seasonic 750W PSU, SONY BRAVIA 48W600B, Windows 10 Pro /64